DynamoDB Tutorial
This tutorial demonstrates using DynamoDB to read/write data from Amazon DynamoDB.
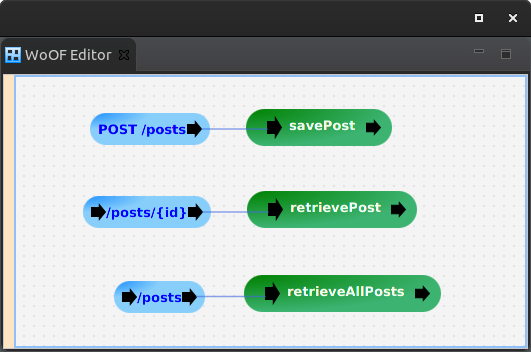
The example used in this tutorial is three end points:
- POST /posts {"message":"Message to post"} to create a post
- GET /posts/{id} to obtain a particular post
- GET /posts to obtain all posts
WoOF configuration
The configuration of the end points are as follows:

With the implementation as follows:
public class DynamoDbLogic {

	public void savePost(Post post, DynamoDBMapper dynamo) {
		dynamo.save(post);
	}

	public void retrievePost(@HttpPathParameter("id") String identifier, DynamoDBMapper dynamo,
			ObjectResponse<Post> response) {
		Post post = dynamo.load(Post.class, identifier);
		response.send(post);
	}

	public void retrieveAllPosts(DynamoDBMapper dynamo, ObjectResponse<Post[]> response) {
		PaginatedScanList<Post> page = dynamo.scan(Post.class, new DynamoDBScanExpression());
		response.send(page.toArray(new Post[1]));
	}
}
The DynamoDB entity is as follows:
@DynamoDBTable(tableName = "Post")
@HttpObject
@Data
@AllArgsConstructor
@NoArgsConstructor
public class Post {

	@DynamoDBHashKey
	@DynamoDBAutoGeneratedKey
	private String id;

	private String message;
}
Configuring DynamoDB
The following dependency is required:
		<dependency>
			<groupId>net.officefloor.persistence</groupId>
			<artifactId>officenosql_dynamodb</artifactId>
		</dependency>

		<!-- Required for testing -->
		<dependency>
			<groupId>net.officefloor.persistence</groupId>
			<artifactId>officenosql_dynamodb_test</artifactId>
			<scope>test</scope>
		</dependency>
DynamoDB is configured in application.objects as follows:
<objects>

	<supplier source="net.officefloor.nosql.dynamodb.DynamoDbSupplierSource">
		<property name="dynamo.entity.locators" value="net.officefloor.tutorial.dynamodbhttpserver.DynamoDbEntities" />
	</supplier>

</objects>
For performance reasons, the entities are not dynamically discovered. As Amazon Lambda starts instances as required, the application must be brought up quickly to service the first request. Having to inspect all jars and classes for entities is typically too slow. Therefore, DynamoDB requires registering all entities with it manually.
Therefore, to make the entities available to DynamoDB, the following is the above configured class:
public class DynamoDbEntities implements DynamoEntityLocator {

	@Override
	public Class<?>[] locateEntities() throws Exception {
		return new Class[] { Post.class };
	}

}
Note: for third party libraries requiring to store data, it is also possible to register entities via a DynamoEntityLocatorServiceFactory. This allows the entities to be automatically registered when the library is added to the class path.
Testing
To make local testing easier, the following unit tests demonstrate automatically setting up a local data store for testing.
	@Order(1)
	@RegisterExtension
	public final DynamoDbExtension dynamoDb = new DynamoDbExtension();

	@Order(2)
	@RegisterExtension
	public final MockWoofServerExtension server = new MockWoofServerExtension();

	@Test
	public void ensureCreatePost() throws Exception {

		// Have server create the post
		Post post = new Post(null, "TEST");
		MockWoofResponse response = this.server.send(MockWoofServer.mockJsonRequest(HttpMethod.POST, "/posts", post));
		response.assertResponse(204, "");

		// Ensure post created
		Post[] created = this.dynamoDb.getDynamoDbMapper().scan(Post.class, new DynamoDBScanExpression())
				.toArray(new Post[1]);
		assertEquals(1, created.length, "Should only be one created post");
		assertEquals("TEST", created[0].getMessage(), "Incorrect post");
	}
JUnit 4 example:
	private final DynamoDbRule dynamoDb = new DynamoDbRule();

	private final MockWoofServerRule server = new MockWoofServerRule();

	@Rule
	public final RuleChain ordered = RuleChain.outerRule(this.dynamoDb).around(this.server);

	@Test
	public void ensureCreatePost() throws Exception {

		// Have server create the post
		Post post = new Post(null, "TEST");
		MockWoofResponse response = this.server.send(MockWoofServer.mockJsonRequest(HttpMethod.POST, "/posts", post));
		response.assertResponse(204, "");

		// Ensure post created
		Post[] created = this.dynamoDb.getDynamoDbMapper().scan(Post.class, new DynamoDBScanExpression())
				.toArray(new Post[1]);
		assertEquals("Should only be one created post", 1, created.length);
		assertEquals("Incorrect post", "TEST", created[0].getMessage());
	}
Next
The next tutorial covers AWS Serverless.


